
Paneer Biryani - Easy Dum Paneer Biryani - Paneer Recipes

Paneer Biryani - a simple home style biryani recipe with paneer. There are unlimited varieties of biryani with so many different variations. Today I prepared this paneer biryani similar to Hyderabadi veg dum biryani. 


I recreated this recipe with my own methods and I have used  the ingredients which are easily accessible. Making this paneer biryani needs some preparation work so we have to plan ahead. Though the recipe is very simple, we may not have all the ingredients. To get the taste and flavor, I suggest you add a drop of kewra essence and saffron milk mentioned below without exceeding the quantity. These two flavours are really needed for this paneer biryani. For this paneer biryani, the classic basmati variety has a wonderful unique flavour and texture. If it is not available you can use any other basmati rice. We have to cook the basmati rice separately until 90 percent is the key to make perfect biryani. If you are using fully cooked rice, it tends to stick to each other and also the rice grains break easily. To get the real flavour and taste of biryani ginger garlic paste is important. In this recipe I have used ginger paste and garlic paste which are ground separately for the unique flavours in the biryani. Recently when I spoke to Chef. Damodran regarding cookery doubts I asked him about the ginger garlic paste. He told me if you use garlic paste and ginger paste separately the biryani will have more flavours for a longer time. He pointed out that we have to take equal measures of garlic and ginger and then grind it smoothly. The quantities mentioned in this recipe will give you a mildly flavoured biryani however you can increase the paste to make more flavourful biryani. You can add homemade or store bought paneer for biryani. I suggest marinating the paneer cubes in thick curd for 30 minutes with mild flavours will be perfect for biryani. Now let's see how to make Paneer Biryani with step by step pictures.

Similar Rice Dishes


Paneer Biryani Recipe Details

Prep time : 25 minutes
Cook time : 30 minutes
Serves : 3
Category : lunch
Author : Muthulakshmi Madhavakrishnan

Ingredients

  • 1 cup basmati rice
  • 250 grams paneer
  • 1 onion
  • 1 green chilly
  • 1 tomato
  • 1/2 tsp chilly powder
  • 1/2 tsp coriander powder
  • 1/2 tsp garamasala powder
  • 1 1/4 tsp ginger paste
  • 1 1/4 tsp garlic paste
  • one drop kewra essence
  • 15 strands saffron
  • 1 tbsp milk
  • 1 onion (for fried onions)
  • 2 bay leaf
  • few cinnamon
  • 6 cloves
  • 4 cardamom
  • 1/2 cup chopped coriander leaves
  • 1/2 cup chopped mint leaves
  • half lemon
  • 1/2 cup thick curd
  • 2 tbsp ghee
  • 3 tbsp oil
  • salt to taste 


Cooking Directions

To begin with Paneer biryani, wash and soak the basmati rice in water for 30 minutes. After 30 minutes, drain the water and cook the rice  until 90 percent in a large vessel with 6 cups of water along with one bay leaf,  few cinnamon, cardamom and cloves. Drain the water completely and allow it to cool down.


Heat a kadai and fry thinly sliced onions till golden and set aside. Beat 1/2 cup thick curd in a bowl. Add the following ingredients one by one. 1/4 tsp ginger paste, 1/4 tsp garlic paste, 1/4 tsp chilly powder, 1/4 tsp coriander powder,  1/4 tsp garam masala powder, half lemon juice and salt.Add the paneer cubes and mix gently. Add the fried onions and mix well. Cover and keep aside for 30 minutes.


Heat oil in a kadai and add whole garam masala. When you get a nice aroma, add sliced onions and green chilly. Saute well for a few minutes. When the onions turn soft, add ginger paste and garlic paste. Saute well for a few minutes until the raw smell disappears. Next add 1/8 cup tomato paste. Saute well for a few minutes and add red chilly powder and coriander powder. After a few minutes, add the garamasala powder. Add the marianted paneer and stir gently for a few minutes until the masalas are coated well. Turn off the heat.


Dissolve one drop kewra water in 2 tsp water and saffron strands in 1 tbsp milk. Keep it ready. 


Add 2 tsp ghee in a thick bottomed cooker or pot. Next, add the paneer masala and spread it evenly. Add all the rice. I have not arranged layers. If you are interested, you can make 2 layers with the marianted paneer and the cooked rice. Add finely chopped coriander leaves, mint leaves, saffron milk, kewra water and 1 tsp ghee. 


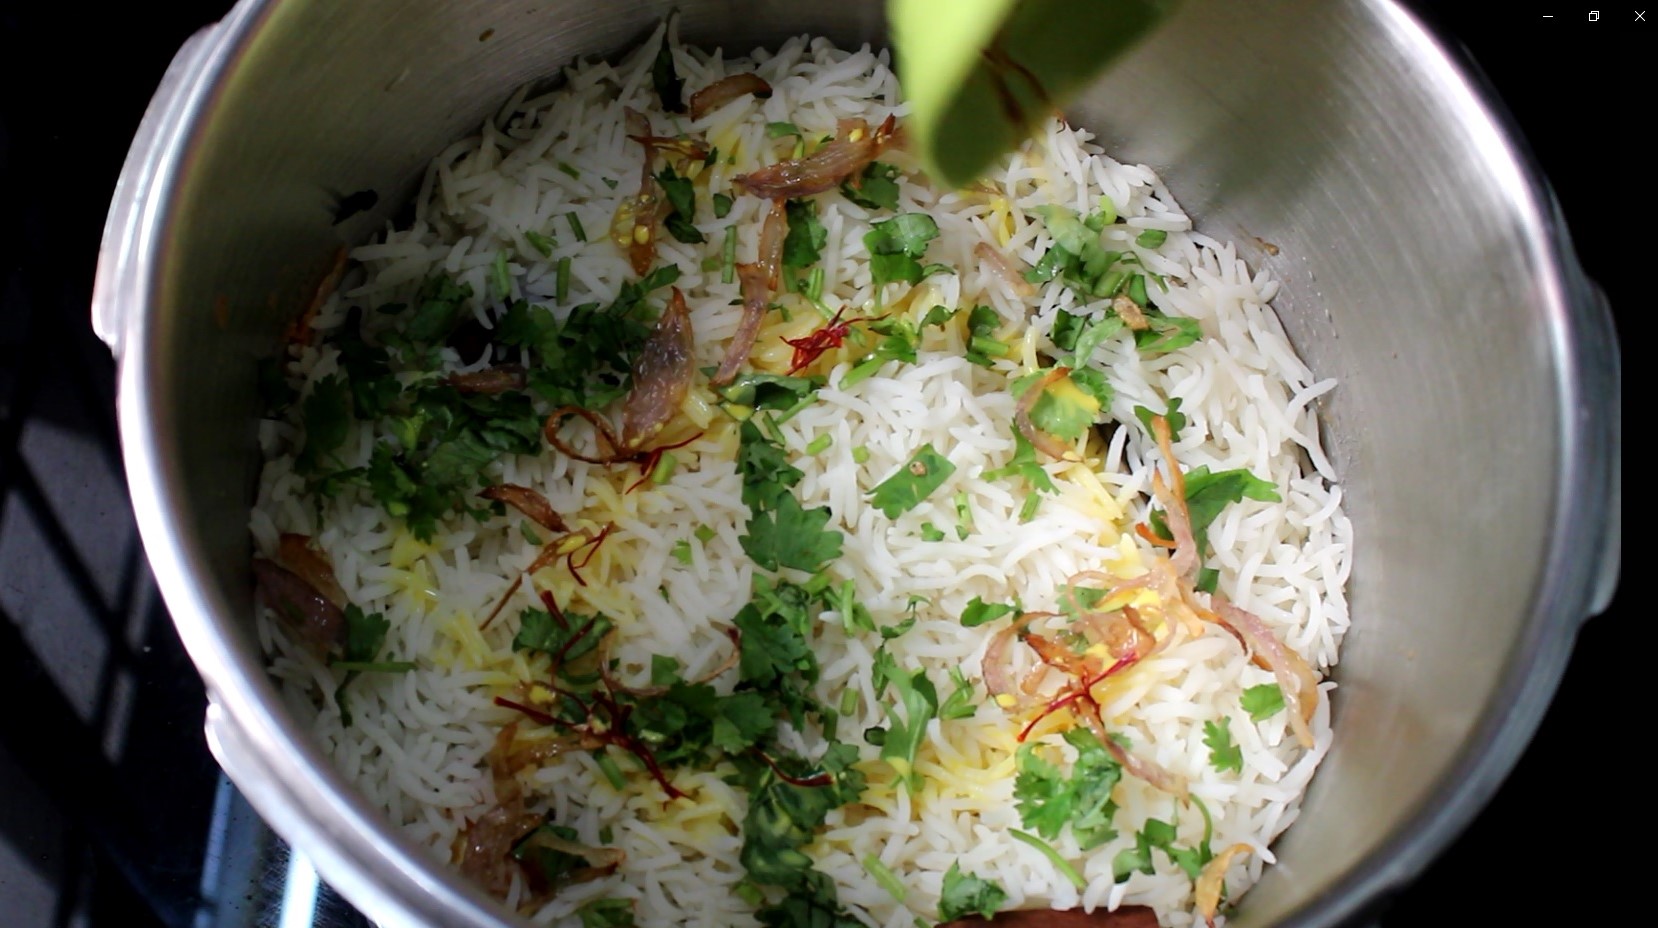
Close it with the lid and cook the rice on low heat for 10 minutes and turn off the heat. Do not hurry up to open after 10 minutes. Allow the biryani to rest for another 20 minutes and then open the pressure cooker. Gently fluff the rice with a spoon. Serve paneer biryani warm with mint coriander leaves raita mixed with cucumber. 


Comments

  1. your blog post is very good. I hope you have enjoyed this recipe, and that it has given you a good idea of how easy it is to make paneer dum biryani at home! .

    ReplyDelete

Post a Comment

Popular posts from this blog

Mushroom Gravy With Curd - Mushroom Curd Masala

Mushroom Gravy with Curd recipe with full video and step by step pictures. This mushroom gravy preparation is little different from other gravies. As the name suggests this gravy is prepared using thick curd and the ground masala paste is made with onions, green chillies, garlic, ginger, poppy seeds, pepper and whole garam masala. The addition of whole garam masala cinnamon, cloves, fennel and cardamom makes the gravy aromatic. This gravy is a good variation from our usual kurma and masala. For this gravy there is no need for tomatoes, cashew nuts and red chilly powder.  This is a quick and easy gravy recipe with a few ingredients.  Spices - you will need bay leaf, cumin, kasuri methi leaves and coriander leaves. For the masala paste onions, ginger, garlic, green chilly, black pepper, cinnamon, cloves, fennel, cardamom and poppy seeds. Poppy seeds are added to give thickness for the gravy.  In the final stage, half teaspoon garam masala powder is sprinkled for flavour but you omit it. 

Collection of Kuzhambu varieties for lunch

KUZHAMBU RECIPES, 20 KUZHAMBU RECIPES FOR LUNCH Kuzhambus are the foundation for a good lunch in South Indian cuisine. Although there are many rice varieties in South Indian cuisine, a bowl of rice and kuzhambu with any vegetable side dish makes our tummy happy. In this collection, I have shared many traditional Tirunelveli kuzhambu recipes. I have suggested authentic ingredients and spices in my kuzhambu recipes. If you find any spices are inconvenient, you may change according to your taste. Now let's see the collection of kuzhambu recipes here. Click on the pictures or the recipe here to view the recipe details with step by step instructions.   Collection of Kuzhambu varieties for lunch 1. Sodhi - Sodhi is one of Tirunelveli's traditional and popular kuzhambu.This kuzhambu is a special menu on the next day of marriage. A Tirunelveli wedding meal would not be complete without this Sodhi, potato poriyal and ginger chutney.  RECIPE HERE. 2. Pulikuzh

Ridge Gourd Kootu - Peerkangai Kootu

Ridge gourd kootu - one of my favourite kootu dish for lunch. Naturally ridge gourd has a soft texture which is suitable for kootu dishes. Mostly we don't add onions, tomatoes and garlic for kootu dishes. For this ridge gourd kootu I have added both chana dal and moong dal. As the ridge gourd has soft texture, it gets cooked easily in a vessel so need for pressure cooking. The dals must be cooked in pressure cooker for the smoother consistency which will be perfect for kootu dishes. My Grandma gave me this idea to include both chana dal and moong dal for this kootu because ridge gourd has high water content moong dal gives thickness to it. After cooking the ridge gourd, the kootu is followed by adding the dals and the coconut paste. The coconut based kootu dishes are popular in most Tirunelveli districts. We all like any  kootu with the combination of dals and coconut small onions cumin paste. In my opinion any kootu dishes must have a mild flavours with a medium thick consi

Easy Milk Sweet - Instant milk sweet with kova, condensed milk and sugar

Easy milk sweet - prepared with condensed milk, unsweetned kova, powdered sugar and ghee. You can easily prepare this milk cake within 30 minutes. Traditionally milk sweets are prepared with milk, which will take more time. We like almost any sweets based on milk products, but most of the milk sweets require some time and patience. So for a change, I planned to prepare an instant and easy milk sweet for this Diwali with unsweetened kova and condensed milk. The taste is similar to the regular milk sweet, and my son Siva enjoying it very much. Sure to become your favourite milk sweet also. To make this easy milk sweet you need unsweetened kova, condensed milk, cardamom powder, powdered sugar, chopped pistachio nuts and ghee. The  kova are sauted in ghee for a few minutes and then mixed with the condensed milk. The kova dough will look like milk halwa and when it gets thick the powdered sugar are mixed well. We have to mix the powdered sugar in two stages so that the sugar will be e

Seppankizhangu Poriyal - Taro Root (Arbi) Fry

Seppankizhangu Poriyal  - this poriyal is prepared with taro root, chilly powder, small onions cumin garlic paste and perfectly roasted in an iron kadai. The best cooking method for this taro root poriyal is to cook the taro roots in an open vessel for 10 minutes on medium heat with a good amount of water. No one likes a mushy taro root, so just keep an eye on it and check them for doneness by inserting a knife. If you cook taro roots in a pressure cooker, it will be too soft and turns mushy. For these types of roast dishes, low heat and long cooking times are important for its texture. The small onions cumin garlic paste, adds flavour to the taro roots. Roasting the taro roots in an iron kadai creates an excellent flavour and texture.   Similar recipes Vazhaikkai Thuvattal -  Raw Banana (Plantain) Stir Fry   Mithi Paavakai Poriyal - Baby Bitter Gourd Stir Fry  Vazhaikkai Poriyal - Raw Banana (Plantain) Poriyal  Brinjal (Egg Plant) Stir Fry -  Kathirikkai Poriyal  Elephant Foot Yam  St

Tirunelveli Kootanchoru - Mixed vegetables rice with dals and spices

Kootanchoru is a popular lunch dish from Tirunelveli. This is our family favourite rice and it is rich in nutrients as it contains lots of vegetables and dals. We prepare this rice frequently for special events and family get togethers.  In most of Tirunelveli dishes we use small onions, garlic, coconut and generous amount of jeera. In this dish also we have used coconut small onion paste and good amount of fresh vegetables. We add commonly used vegetables such as raw banana, brinjals, drumsticks, carrots, beans and potatoes. I have learned this recipe from my grandma. She taught me with her some useful tips and techniques about how to cook, when to add the ingredients and how to choose the correct vegetables. My son named as Tirunelveli biriyani for this rice.  Now let's see how to prepare this kootanchoru with step by step photos.   Here is a short video for Tirunelveli Kootanchoru

Mixed Vegetable Rice with Dal - One Pot Protein Rich Rice Recipe - Modern Kootanchoru

Mixed vegetable rice with step by step photos and video. Quick one pot rice within 30 minutes. Apart from kootanchoru and thuvaram paruppu sadham we make this mixed vegetable rice for weekend lunch and family get togethers.  During our childhood days, my Karthi mama makes this rice for dinner and always one of our favourite rice dishes for our whole family. During his bachelor days in Delhi, they prepared this rice frequently with whatever vegetables available in their kitchen. Making of this vegetable  rice doesn't involve any grinding or soaking and bachelor's can easily cook this rice. When it comes to any rice with dals, it must be slightly mushy with soft texture. But I do not like mushy rice, so I have reduced the amount of water. You can change it according to your preference. Allow the rice to cook on medium heat for 10 to 15 minutes or pressure cook for 2 whistles. Cooking time may vary depending on the quality of the rice and the pressure cooker.  To make this healthy

Collection of side dishes for lunch

Collection of side dishes for lunch Here is a collection of vegetable side dishes like thuvaram, kootu, aviyal, pachadi, puttu etc for your everyday lunch. All the dishes are very easy and healthy.

Easy Tiffin Sambar - Quick Hotel Style Tiffin Sambar for Idli, Dosa and Ven Pongal

Easy tiffin sambar with full video and step by step pictures. This tiffin sambar is a simple, easy, quick and delicious sambar for idli, dosa and ven pongal. You can easily prepare this tiffin sambar for festivals and other family occasions because it's easy and quick without any complicated steps.  This tiffin sambar includes moong dal, carrots, potato, brinjal, onions, tomato and green chilly. You can also include vegetables like capsicum, yellow pumpkin for this sambar.  I prefer to use moong dal for this sambar. When compared to moong dal, toor dal requires more time to cook so I omitted it. Instead of moong dal you can also use masoor dal .  To keep this recipe simple, I used sambar powder and there is no need for any dry  roasting and grinding works. A handful of fresh coconut is ground along with cooked tomato and sambar powder which gives a nice colour for the sambar. If you plan to prepare sambar in advance make the sambar in thin consistency because moong dal sambar thick

Wheat Rava Kichadi With Vegetables - Samba Godhuma Rava Kichadi - Healthy Breakfast

A healthy diabetic friendly kichadi recipe made with wheat rava. You can start your breakfast with a cup of this healthy kichadi as it includes carrot, green peas and beans which blend together beautifully with wheat rava. A handful of fresh green peas gives a slightly sweet taste for the kichadi.  There are two main varieties of wheat rava - medium coarse and fine coarse. Fine coarse wheat rava is my favourite for kichadi and upma dishes. Medium coarse wheat rava is perfect for sweet pongal and payasam. Both types require more time to cook when compared to regular white rava. Fine coarse wheat rava doesn't need to be roasted for this kichadi. To cook 1 cup fine coarse wheat rava you will need 3 cups of water. After preparing the kichadi you should let it stand for 15 minutes, covered and undisturbed for a perfect fluffy texture. And once you find how to cook wheat rava perfectly, you will be making it regularly for your breakfast.  Check out my other tiffin recipes here Idli Black