Palak Paneer - delicious gravy made with paneer, palak leaves, onions, tomatoes and fresh cream. This gravy does not take a lot of effort to prepare, it simply requires two steps like sauteing and grinding the greens. During my college days I saw this recipe in a cookbook by Chef. Mallika Badrinath madam, which was so easy to make with simple steps.
 Usually I follow this method for this gravy. Palak leaves tend to cook easily, so we have to keep an eye on it when sauteing the leaves. For this gravy no need to blanch the leaves because it takes more time and I also noticed a raw smell of the leaves in the gravy. In this recipe, the leaves are sauted in a drop of oil along with green chillies for 3 minutes. After that grind it along with the sauted onions, tomatoes, garlic and ginger. To flavour the gravy I have added garamasala powder in minimal amount, but if you want you can add as you like. In the final stage 1/4 cup of grated panner is added to enhance the taste. Fresh cream is added to thicken the gravy plus it also gives a lingering taste to the gravy. As I said in my previous posts, do not cook the gravy for a long time after adding paneer. You can soak the paneer cubes in warm water for 10 minutes and then add it to the gravy. This ensures that paneer stays soft in the gravy even if you serve the gravy after 2 to 3 hours. Now let's see how to prepare Palak Paneer with step by step instructions.
Similar Recipes
Paneer Methi Masala
Paneer Butter Masala
Shahi Gobi Masala
Mushroom Butter Masala
Chenna Masala
Green Peas Masala
Broccoli Masala
Rajma Masala
Palak Paneer Recipe Details

Prep time : 15 minutes
Cook time : 25 minutes
Serves : 3
Category : side dish
Author : Muthulakshmi Madhavakrishnan
Ingredients
Palak Paneer with step by step photos
Wash the palak leaves very well in running water. Heat oil in a kadai and add the green chilly.
 Fry the chillies for a minute and add the palak leaves. Stir often and saute the leaves on low heat for 3 minutes.
 After 3 minutes, the leaves get cooked and turn off the heat. Transfer it immediately to a plate and allow it to cool down.
 Heat oil in the same kadai and add 6 garlic cloves, ginger and onions. Stir and saute.
 When the onions turn soft, add the chopped tomatoes. Saute until the tomatoes turn soft.
 Now take a big mixer jar and add all the sauted ingredients.
 Grind it to a smooth paste without any water.
 Heat ghee in a kadai and add the cumin. Allow them to splutter.
 Then add 2 finely chopped garlic and 1 finely chopped onion.
 Saute till the raw smell of the garlic goes well. Next add the ground palak paste. Stir well.
 Add 1/2 cup of water and mix well. Then add red chilly powder, turmeric
powder and garamasala powder.
Add 1/2 cup of water and mix well. Then add red chilly powder, turmeric
powder and garamasala powder.
 Add the required salt and mix well.
 Allow the gravy to boil for 3 to 5 minutes on low heat. Now add 1 tsp sugar and once again mix well.
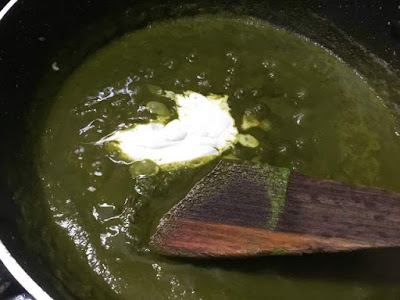
 Add 2 tbsp fresh cream and mix it well with the gravy.
 When the fresh cream has mixed well with the gravy, add the grated paneer.
 Stir and add the paneer cubes and mix it well with the gravy.
 Cook the gravy for 2 minutes and turn off the heat.
 Serve Palak Paneer with roti, nann or jeera rice.


Similar Recipes
Paneer Methi Masala
Paneer Butter Masala
Shahi Gobi Masala
Mushroom Butter Masala
Chenna Masala
Green Peas Masala
Broccoli Masala
Rajma Masala
Palak Paneer Recipe Details

Cook time : 25 minutes
Serves : 3
Category : side dish
Author : Muthulakshmi Madhavakrishnan
Ingredients
- 150 grams paneer
- 1 bunch palak
- 1 green chilly
- 2 onion
- 1 tomato
- 8 garlic cloves
- small piece ginger
- 1 tsp cumin
- 1/4 tsp turmeric powder
- 1/2 tsp red chilly powder
- 1/4 tsp garamasala powder
- 1 tsp sugar
- 2 tbsp fresh cream
- 1/4 cup grated paneer
- salt to taste
- 1 tsp oil
- 2 tbsp ghee
- Wash the palak leaves very well in running water. Heat oil in a kadai and add the green chilly.
- Fry the chillies for a minute and add the palak leaves. Stir often and saute the leaves on low heat for 3 minutes. After 3 minutes, the leaves get cooked and turn off the heat.Transfer it immediately to a plate and allow it to cool down.
- Heat oil in the same kadai and add 6 garlic cloves, ginger and onions. Stir and saute.When the onions turn soft, add the chopped tomatoes. Saute until the tomatoes turn soft.
- Now take a big mixer jar and add all the sauted ingredients. Grind it to a smooth paste without any water.
- Heat ghee in a kadai and add the cumin. Allow them to splutter. Then add 2 finely chopped garlic and 1 finely chopped onion.
- Saute till the raw smell of the garlic goes well. Next add the ground palak paste. Stir well.
- Add 1/2 cup of water and mix well. Then add red chilly powder, turmeric powder and garamasala powder. Add the required salt and mix well.
- Allow the gravy to boil for 3 to 5 minutes on low heat. Now add 1 tsp sugar and once again mix well.
- Add 2 tbsp fresh cream and mix it well with the gravy.When the fresh cream has mixed well with the gravy, add the grated paneer.
- Stir and add the paneer cubes and mix it well with the gravy. Cook the gravy for 2 minutes and turn off the heat.
Palak Paneer with step by step photos
Wash the palak leaves very well in running water. Heat oil in a kadai and add the green chilly.


Comments
Post a Comment