Chickpeas and potato kurma - prepared with chickpeas(kondaikadalai), potato and flavoured with onions, tomato and whole garam masala. A perfect side to chapathi, poori, dosa and aapam. Kurmas are especially a special dish in Tamil Nadu with different varieties. In most of the South Indian restaurants this chickpeas potato kurma is served as a side dish for chola poori.

My son Siva like this chickpeas kurma for poori very much. Most of the time I prepare potato masala or chana masala for poori but now a days Siva is asking me to prepare this kurma for poori. The best kind of kurmas are the ones with a correct balance of flavours without much oil. I learned these tips with lots of experiments with kurma. For this kurma there is no need to add cashew nuts, poppy seeds or any other fresh creams for a thick consistency. The onions, tomatoes, ginger, garlic and whole garam masala is ground to a thick paste along with fresh coconut. The fennel seeds add a mild sweetness to this gravy, so do not skip it. In this dish, I have not added garam masala powder and coriander powder. If you want to include, you can add it also. This kurma comes together quickly. When the chickpeas are cooking, just chop the onions, tomatoes, ginger and grind the masala paste. You can prepare the gravy within 20 minutes. Now let's see how to prepare this Chickpeas and potato kurma in detail.
Here is a short video for Channa Potato Kurma
Checkout my other Kurma recipes
Chickpeas and Potato Kurma Recipe Details

Prep time : 15 minutes
Cook time : 20 minutes
Soaking time : 8 hours
Serves : 3
Category : side dish
Author : Muthulakshmi Madhavakrishnan
Ingredients
Chickpeas and Potato Kurma with step by step photos
Measure and take the chick peas in a vessel and rinse it for a couple of times. Soak with 2 to 3 cups of water for 8 hours. After 8 hours once again rinse it and drain the water. Wash the potato and peel the skin. Cut into small cubes. Take a small pressure cooker or pan and add the chick peas and potato. Add 1 cup of water and pressure cook for 5 to 7 whistles.
 Cut the onions, tomatoes, ginger and peel the garlic cloves. Grate the coconut and keep all the masalas ready for grinding.
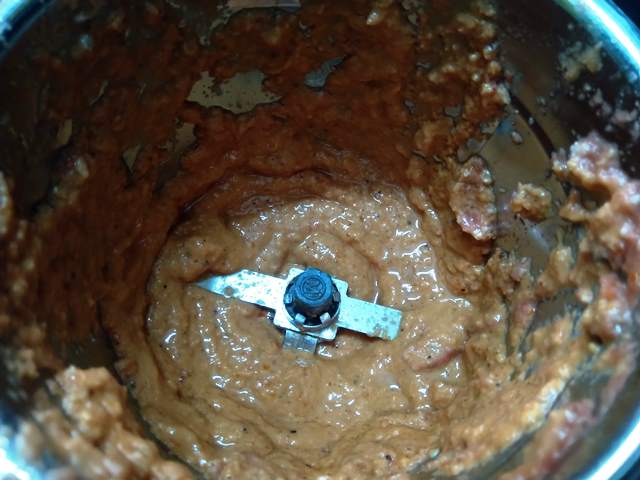
 Take a big jar and add the spices one by one and then add the onions,
tomatoes, ginger and garlic. Grind it without any water and add the
coconut and grind it smoothly.
Take a big jar and add the spices one by one and then add the onions,
tomatoes, ginger and garlic. Grind it without any water and add the
coconut and grind it smoothly.
 Heat oil in a kadai and add the cinnamon, sliced onions and green chilly.
 Stir and saute the onions on medium heat until soft.
 Next, add the ground coconut masala paste and stir it well.
 Add the red chilly powder and turmeric powder and stir it continuously for a few minutes until the raw smell goes off.


My son Siva like this chickpeas kurma for poori very much. Most of the time I prepare potato masala or chana masala for poori but now a days Siva is asking me to prepare this kurma for poori. The best kind of kurmas are the ones with a correct balance of flavours without much oil. I learned these tips with lots of experiments with kurma. For this kurma there is no need to add cashew nuts, poppy seeds or any other fresh creams for a thick consistency. The onions, tomatoes, ginger, garlic and whole garam masala is ground to a thick paste along with fresh coconut. The fennel seeds add a mild sweetness to this gravy, so do not skip it. In this dish, I have not added garam masala powder and coriander powder. If you want to include, you can add it also. This kurma comes together quickly. When the chickpeas are cooking, just chop the onions, tomatoes, ginger and grind the masala paste. You can prepare the gravy within 20 minutes. Now let's see how to prepare this Chickpeas and potato kurma in detail.
Here is a short video for Channa Potato Kurma
Checkout my other Kurma recipes
- Paneer Kurma
- Hotel Vegetable Kurma
- Cauliflower Kurma
- Mushroom Kurma
- Carrot and Green peas Kurma
- Beetroot Kurma
- Turnip and Chickpeas Kurma
- Tomato Kurma
- White Vegetable Kurma
Chickpeas and Potato Kurma Recipe Details

Cook time : 20 minutes
Soaking time : 8 hours
Serves : 3
Category : side dish
Author : Muthulakshmi Madhavakrishnan
Ingredients
- 1/2 cup chickpeas
- 1 potato
- 1 onion, thinly sliced
- 1 green chilly
- 2 small piece cinnamon
- 1 tsp turmeric powder
- 1/2 tsp red chilly powder
- small piece jaggery
- few coriander leaves
- salt to taste
- 4 tbsp oil
- 1/2 cup fresh coconut
- 1 onion
- 2 ripe tomato
- 5 garlic cloves
- small piece ginger
- 1 tsp fennel
- 3 cardamom
- 3 cloves
- 1 star aniseed
- Measure and take the chick peas in a vessel and rinse it for a couple of times. Soak with 2 to 3 cups of water for 8 hours. After 8 hours once again rinse it and drain the water. Wash the potato and peel the skin. Cut into small cubes. Take a small pressure cooker or pan and add the chick peas and potato. Add 1 cup of water and pressure cook for 5 to 7 whistles.
- Take a big jar and add the spices one by one and then add the onions, tomatoes, ginger and garlic. Grind it without any water and add the coconut and grind it smoothly.
- Heat oil in a kadai and add the cinnamon, sliced onions and green chilly.Stir and saute the onions on medium heat until soft.
- Next, add the ground coconut masala paste and stir it well.
- Add the red chilly powder and turmeric powder and stir it continuously for a few minutes until the raw smell goes off.
- Now add 1/2 cup of water and mix well. Add the required salt and allow the gravy to boil for 5 minutes.
- After 5 minutes, add the cooked chick peas and potato along with the cooked water and mix well.
- Add a small piece jaggery and allow the kurma to boil for 7 to 9 minutes.
- When you see the oil specks on the top of the kurma, add the chopped coriander leaves and turn off the heat.
Chickpeas and Potato Kurma with step by step photos
Measure and take the chick peas in a vessel and rinse it for a couple of times. Soak with 2 to 3 cups of water for 8 hours. After 8 hours once again rinse it and drain the water. Wash the potato and peel the skin. Cut into small cubes. Take a small pressure cooker or pan and add the chick peas and potato. Add 1 cup of water and pressure cook for 5 to 7 whistles.


Now add 1/2 cup of water and mix well. Add the required salt and allow the gravy to boil for 5 minutes.

After 5 minutes, add the cooked chick peas and potato along with the cooked water and mix well.

Add a small piece jaggery and allow the kurma to boil for 7 to 9 minutes.

When you see the oil specks on the top of the kurma, add the chopped coriander leaves and turn off the heat.

Transfer the kurma to the serving dish and enjoy with poori.

Comments
Post a Comment