
Vegetable Momos - Vegetable Dumplings - Starter Recipes

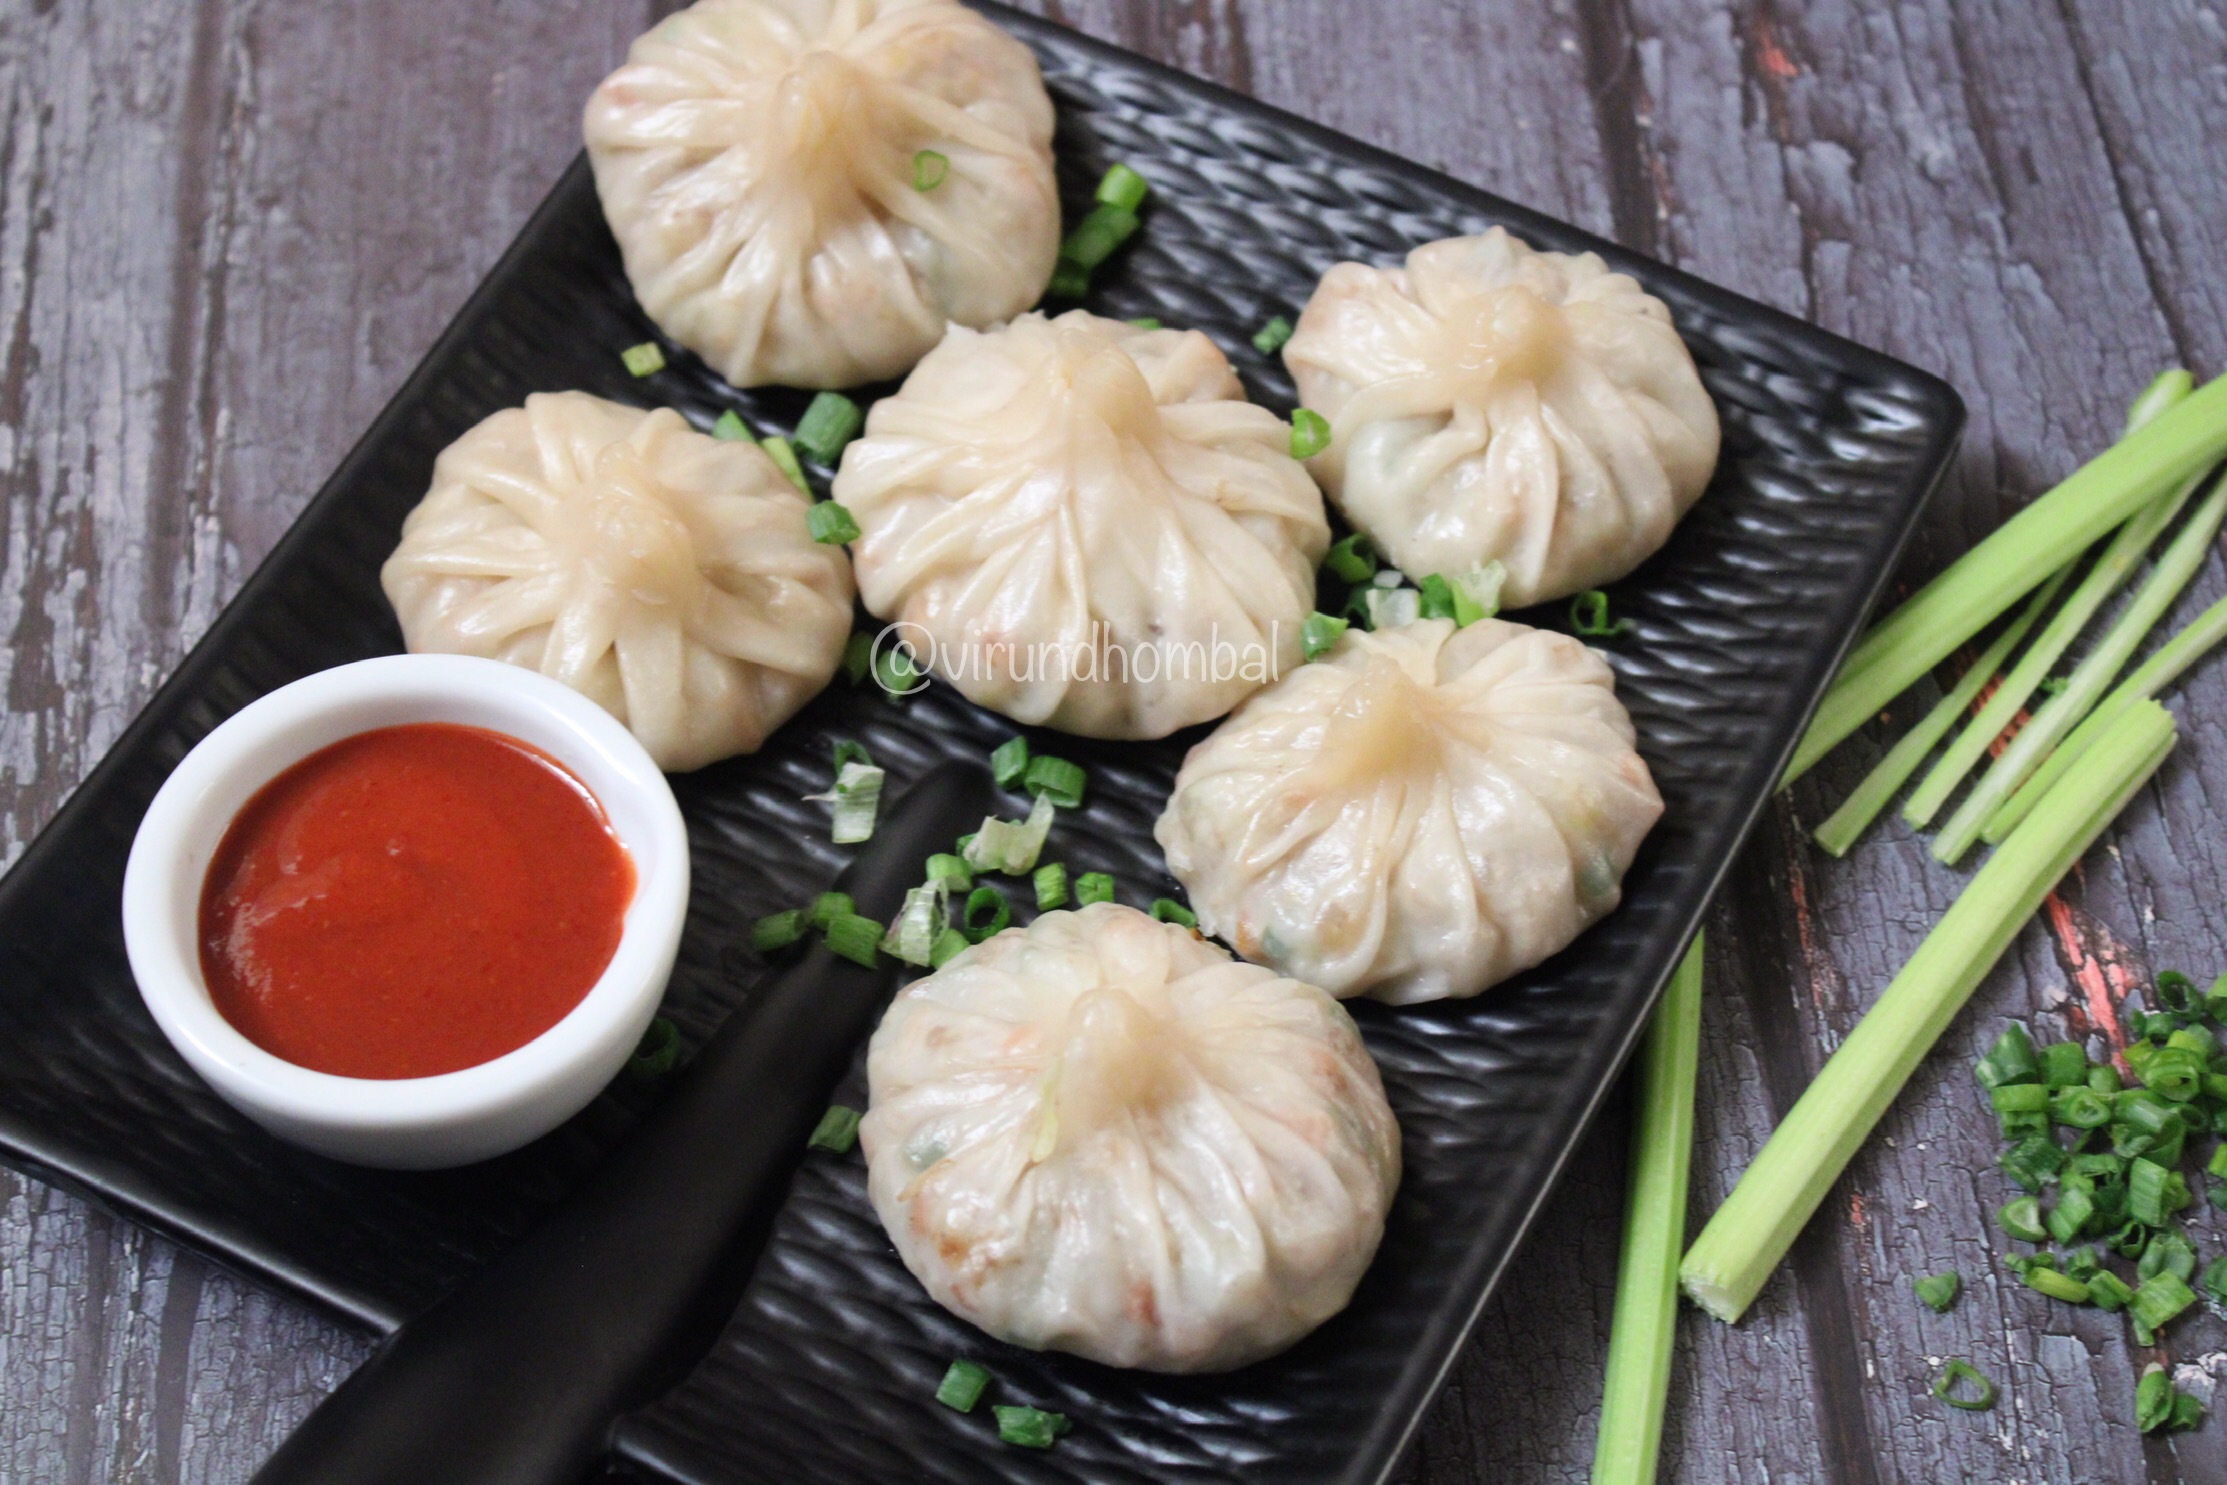
Vegetable momos are a super addictive snack that everyone likes. Most of the Chinese restaurants have different varieties like vegetable momos, fried momos, green momos, chicken momos etc. One of the common momos you can easily find on the streets is the vegetable momos. 


It is a simple snack, but it requires some time to finish the whole process. If you prepare the vegetable stuffing earlier, you can prepare the momos easily within 20 minutes. I made several experiments to bring  the thin outer layer and finally my husband did it. He always wanted to recreate dishes like samosa and parotta  to bring the perfect texture. A few years ago, I  prepared ten samosa recipes for Aval kitchen magazine which was prepared fully by my husband. I just made the stuffing and deep fried it. He made the samosa patties perfectly and it tasted good. Here for momos also he used the same technique to prepare the outer layer and the momos turn perfect. 

It's very simple to prepare the vegetable stuffing. All you have to do is to finely chop the vegetables and then we have to stir fry with plenty of aromatics like ginger and garlic and toss them well with pepper powder and soya sauce. You don't need to add water for cooking the vegetables and the vegetables must be a little crisp, which is what I like in the momos. 


Once you prepare the vegetable stuffing, start preparing the outer layer for the momos. Knead the dough on the rolling board without any cracks and then prepare small balls. To make the outer layer, roll a portion of the dough into a small circle. Roll another 2 more circles of the same size. Now take one small circle and spread 1/4 tsp oil and flour over the circle and place another circle one over the other. Repeat the same process for another circle and then place another circle. Now gently roll again into a thin circle. Gently separate each circle from the edges. Once you're done, you can start stuffing the momos and then make momos, whatever shapes you want and steam it for 7 to 9 minutes.  

Here is the video link for Vegetable Momos


My article in Vikatan about my Vegetable Momos Recipe

https://www.vikatan.com/food/veg-momos

Vegetable Momos Recipe Details

Prep time : 45 minutes
Cook time : 20 minutes
Yields : 15 momos
Category : starter
Author : Muthulakshmi Madhavakrishnan  

Ingredients 

  • 1 cup all purpose flour (maida)
  • 2 tsp oil
  • 1/4 tsp salt
  • 1 cup chopped cabbage
  • 1/4 cup chopped carrot 
  • 1 tbsp finely chopped ginger
  • 1 tbsp finely chopped garlic
  • 1 tsp finely chopped celery
  • 1 tbsp chopped spring onion whites
  • 1 tbsp chopped spring onion leaves 
  • 1/2 tsp pepper powder 
  • 1/2 tsp soya sauce
  • salt to taste
  • 2 tsp oil

Cooking Directions 

1. For the dough

Take a bowl and add all purpose flour, salt and oil. Mix well. Add water little by little and knead a firm dough. If the dough appears sticky, add flour and knead it well. Do not make the  dough soft, then it will be difficult to make a thin outer layer. Cover the dough and keep aside for 30 minutes.


2. For the vegetable filling 

Heat oil in a kadai and add ginger and garlic. Saute for 3 seconds. Do not brown them. Then add the spring onion whites and celery. Stir and saute for 1 minute. Add the chopped carrot and cabbage. Stir and saute the vegetables on high heat for 3 minutes. Then add salt, black pepper powder and soy sauce. Continue to stir well until the vegetables are mixed well and add the spring onion greeens. Turn off the heat and allow the stuffing to cool down. 


3. Shaping the momos 

Place the dough on your kitchen counter top or on the rolling board and knead the dough smoothly without any cracks for 5 minutes. Make a 9 inches log and cut it into equal balls. Shape the balls once again with your palms. 


Take each ball and roll into a small circle. Prepare three circles of equal sizes.Place the first circle on the rolling board and spread little oil and sprinkle little flour over the circle. Place another circle and do the same method. Place the third circle over the second dusted circle and roll again into a thin circle.


Now gently separate the circles from the edges and now you can get a thin outer layer for the momos. Repeat the steps to make the momos outer layer. The edges have to be thin and the centre must be thick. 


Now place 2 to 3 tbsp vegetable stuffing in the centre. From one side start pleating tightly and join the pleats in the centre. Prepare all the momos according to your comfort and keep it covered until you are ready to steam them. Add 1 cup water in an idli pot and allow it to boil . 


Grease the plate with little oil and place the momos. Cover and steam cook for 7 to 9 minutes. Don't need to cook the momos for more than 9 minutes because it becomes very hard. 


Serve it hot with hot sauce or tomato chutney. 


Comments

Post a Comment

Popular posts from this blog

Easy Paneer Gravy - Paneer Masala within 20 minutes - Paneer Recipes

This easy paneer gravy is a mouthwatering side dish made with paneer cooked in a rich gravy prepared with  onions, tomatoes and other spices. It's mild and not very spicy, which tastes so good with chapathi, nann, roti and pulao.  Paneer gravies can be made in a variety of ways. This recipe is the easy version of paneer butter masala. Most of the time we prepare paneer gravy with fresh cream, butter and cashew nuts. To make a tasty paneer masala, you do not need fresh cream. You can easily make restaurant style paneer gravy with easily available ingredients in your kitchen. I always like to add a few cashew nuts while making gravies, which gives a creamy consistency. The addition of dried kasuri methi leaves gives a unique flavour for paneer based gravies. I used homemade garamasala powder for gravies which does not include red chillies or pepper in it. Add garamasala powder to your personal taste preferences.Now let's see how to prepare this easy paneer gravy with step by step

Mushroom Gravy With Curd - Mushroom Curd Masala

Mushroom Gravy with Curd recipe with full video and step by step pictures. This mushroom gravy preparation is little different from other gravies. As the name suggests this gravy is prepared using thick curd and the ground masala paste is made with onions, green chillies, garlic, ginger, poppy seeds, pepper and whole garam masala. The addition of whole garam masala cinnamon, cloves, fennel and cardamom makes the gravy aromatic. This gravy is a good variation from our usual kurma and masala. For this gravy there is no need for tomatoes, cashew nuts and red chilly powder.  This is a quick and easy gravy recipe with a few ingredients.  Spices - you will need bay leaf, cumin, kasuri methi leaves and coriander leaves. For the masala paste onions, ginger, garlic, green chilly, black pepper, cinnamon, cloves, fennel, cardamom and poppy seeds. Poppy seeds are added to give thickness for the gravy.  In the final stage, half teaspoon garam masala powder is sprinkled for flavour but you omit it. 

Tirunelveli Kootanchoru - Mixed vegetables rice with dals and spices

Kootanchoru is a popular lunch dish from Tirunelveli. This is our family favourite rice and it is rich in nutrients as it contains lots of vegetables and dals. We prepare this rice frequently for special events and family get togethers.  In most of Tirunelveli dishes we use small onions, garlic, coconut and generous amount of jeera. In this dish also we have used coconut small onion paste and good amount of fresh vegetables. We add commonly used vegetables such as raw banana, brinjals, drumsticks, carrots, beans and potatoes. I have learned this recipe from my grandma. She taught me with her some useful tips and techniques about how to cook, when to add the ingredients and how to choose the correct vegetables. My son named as Tirunelveli biriyani for this rice.  Now let's see how to prepare this kootanchoru with step by step photos.   Here is a short video for Tirunelveli Kootanchoru

Collection of Kuzhambu varieties for lunch

KUZHAMBU RECIPES, 20 KUZHAMBU RECIPES FOR LUNCH Kuzhambus are the foundation for a good lunch in South Indian cuisine. Although there are many rice varieties in South Indian cuisine, a bowl of rice and kuzhambu with any vegetable side dish makes our tummy happy. In this collection, I have shared many traditional Tirunelveli kuzhambu recipes. I have suggested authentic ingredients and spices in my kuzhambu recipes. If you find any spices are inconvenient, you may change according to your taste. Now let's see the collection of kuzhambu recipes here. Click on the pictures or the recipe here to view the recipe details with step by step instructions.   Collection of Kuzhambu varieties for lunch 1. Sodhi - Sodhi is one of Tirunelveli's traditional and popular kuzhambu.This kuzhambu is a special menu on the next day of marriage. A Tirunelveli wedding meal would not be complete without this Sodhi, potato poriyal and ginger chutney.  RECIPE HERE. 2. Pulikuzh

Badusha - Sweet with maida (all purpose flour, ghee and sugar) - Easy Diwali Sweet

Badusha is a popular sweet prepared with maida, ghee and sugar. Badushas are one of the favourite desserts for my husband. This dessert comes together quite easily because it doesn't require any difficult steps like stirring work for halwa or burfi. The dough is also easy to knead with two simple steps. Let us see some important tips for perfect badusha. Making dough for badusha To make successful dough for badusha it is important to develop gluten in the dough by kneading with proper ingredients and measurements. For the dough all you need is maida, ghee and a pinch of baking soda. No special equipments like beater or anything is not required to knead the dough. Just add a pinch of baking soda to get a soft texture for the badusha. But do not add more than a pinch because it will be separated while frying the badusha. I have experimented with butter and ghee for kneading the dough and I got perfect results with ghee. For 500 grams maida, 175 to 200 grams of ghee are requ

Easy Milk Sweet - Instant milk sweet with kova, condensed milk and sugar

Easy milk sweet - prepared with condensed milk, unsweetned kova, powdered sugar and ghee. You can easily prepare this milk cake within 30 minutes. Traditionally milk sweets are prepared with milk, which will take more time. We like almost any sweets based on milk products, but most of the milk sweets require some time and patience. So for a change, I planned to prepare an instant and easy milk sweet for this Diwali with unsweetened kova and condensed milk. The taste is similar to the regular milk sweet, and my son Siva enjoying it very much. Sure to become your favourite milk sweet also. To make this easy milk sweet you need unsweetened kova, condensed milk, cardamom powder, powdered sugar, chopped pistachio nuts and ghee. The  kova are sauted in ghee for a few minutes and then mixed with the condensed milk. The kova dough will look like milk halwa and when it gets thick the powdered sugar are mixed well. We have to mix the powdered sugar in two stages so that the sugar will be e

Quick Tiffin Sambar - Side Dish for Idli, Dosa and Ven Pongal - Sambar without Tamarind

Quick tiffin sambar recipe with moong dal, toor dal and combination of vegetables. We have tasted this tiffin sambar many times at our Grandma's house prepared by our home chef Deivanai at Tirunelveli. Usually they put onions, chow chow (chayote), carrots, potatoes, tomatoes, green chillies and dals. We have different versions of tiffin sambar in every household with any vegetables as they prefer. You can add capsicum, drumstick or yellow pumpkins too. This sambar recipe is a bit unique recipe with a  combination of dals and  without any tamarind. I wanted to try this quick tiffin sambar at home for a long time. Last week during my visit to Tirunelveli I called her up and asked for the recipe. She explained the recipe  with a few simple steps and the sambar turned out well. This tiffin sambar is a simple yet tasty sambar and perfect side dish for idli, dosa and ven pongal.  Check out my other side dishes for idli and dosa Brinjal Kichadi  Brinjal Kichadi with Dal Puli Milagai Tomat

Ladies finger Pachadi - Tirunelveli Vendakka Pachadi

This is a wonderful Tirunelveli Ladies finger pachadi that is usually served with sambar and rasam. There are many versions for this recipe. This version includes ladies finger, tomato, raw mangoes and it gets flavouring from small onions, red chilly powder and asafoetida powder.  The coconut paste adds a delicious richness to the pachadi. Simple to make and a very tasty side dish for traditional South Indian meals.

Wheat Rava Kichadi With Vegetables - Samba Godhuma Rava Kichadi - Healthy Breakfast

A healthy diabetic friendly kichadi recipe made with wheat rava. You can start your breakfast with a cup of this healthy kichadi as it includes carrot, green peas and beans which blend together beautifully with wheat rava. A handful of fresh green peas gives a slightly sweet taste for the kichadi.  There are two main varieties of wheat rava - medium coarse and fine coarse. Fine coarse wheat rava is my favourite for kichadi and upma dishes. Medium coarse wheat rava is perfect for sweet pongal and payasam. Both types require more time to cook when compared to regular white rava. Fine coarse wheat rava doesn't need to be roasted for this kichadi. To cook 1 cup fine coarse wheat rava you will need 3 cups of water. After preparing the kichadi you should let it stand for 15 minutes, covered and undisturbed for a perfect fluffy texture. And once you find how to cook wheat rava perfectly, you will be making it regularly for your breakfast.  Check out my other tiffin recipes here Idli Black

Semi Ripe Papaya Stir Fry - Pappalikkai Puttu (Poriyal)

This stir fry is prepared with shredded semi ripe papaya. This stir fry is easy to make within 10 minutes. This stir fry is similar to carrot puttu and beetroot puttu.    Semi ripe papaya is light orange in colour with a crisp texture and it has a very mild flavour. The shredded papaya is flavoured with green chillies, onions and finally garnished with fresh coconut. The semi raw papayas are peeled and the innermost white layers are removed along with their tiny seeds. Then they are cut into halves or quarters and  grate it using a slightly thick grater. After grating, we have to saute with mustard, chillies, onions and curry leaves. For this puttu dishes, like carrot puttu and beetroot puttu, the grated vegetables will need to be sauted first for an extra few minutes and then close and cook for 5 to 7 minutes. No water is required for this stir fry. Simply close and cook on low heat for 5 minutes. A handful of freshly grated coconut adds a beautiful colour and taste to this dish.  Sim