
Magizhampoo Thenkuzhal

Magizhampoo Thenkuzhal/ Mullu Murukku

Magizhampoo thenkuzal also called as mullu murukku. For this thenkuzal we use three different dals - moongdal, chana dal and urid dal. These dals are roasted to bring out the aromas and then powdered. The freshly ground flour is mixed with the ground rice batter. The magizhampoo thenkuzal cooked in your house will delight you.


Magizhampoo thenkuzal also called as mullu murukku. For this thenkuzal we use three different dals - moongdal, chana dal and urid dal. These dals are roasted to bring out the aromas and then powdered. The freshly ground flour is mixed with the ground rice batter. The magizhampoo thenkuzal cooked in your house will delight you. Grinding the rice is a superb way to prepare thenkuzal or thattai. It gives the perfect shape, taste and texture of the dish. The thenkuzal stays fresh and flavorful without adding fried gram flour. Deep frying the thenkuzal can be coconut oil, groundnut oil or vegetable oil, depending upon the flavour you want. I recommend coconut oil for thenkuzhal because the flavour in the coconut oil, add extra taste for the thenkuzhal.

Grinding the rice is a superb way to prepare thenkuzal or thattai. It gives the perfect shape, taste and texture of the dish. The thenkuzal stays fresh and flavorful without adding fried gram flour. Deep frying the thenkuzal can be coconut oil, groundnut oil or vegetable oil, depending upon the flavour you want. I recommend coconut oil for thenkuzhal because the flavour in the coconut oil, add extra taste for the thenkuzhal. 

The main steps in thenkuzal are 
1. Preparation of ingredients
Roast the dals separately. Do not brown them. Sieve the flours 2 or 3 times and add it to the ground rice batter.  Soak the rice for 3 to 4 hours. Grind the rice to a smooth paste with little water. Add the butter in the room temperature.
2. Water
Never pour water to the ground rice batter. After adding the roasted dal powder sprinkle little water if required. Generally for this method, it doesn't require any water after grinding.
3. Frying
For uniform cooking do not increase and decrease the flame when frying the thenkuzal. Always keep on low medium flame for perfect results. Avoid frying on high flame. 

Here is a short video for Magizhampoo Thenkuzhal 


Print Friendly and PDF

Prep time : 1 hour
Cook time : 2 hours
Yield : 90 thenkuzhal
Category : Savouries

Ingredients


  • 4 cups idly rice
  • 1/4 cup urid dal
  • 1/4 cup moong dal
  • 1/4 cup chana dal
  • 1 tbsp black sesame seeds
  • 3 tbsp unsalted butter (amul or aavin)
  • salt
  • 1 ltr coconut oil
Cooking Directions

1. Wash the rice 3 times in water and add 8 cups of water. Soak the rice for 3 to 4 hours.

2. Heat a pan and dry roast the chana dal. Stir and roast the dal on low flame. In the same pan, roast the moong dal. When you see light brown colour on few dals transfer it to the plate. Finally, add the urid dal. Roast it till light golden brown and transfer it to the plate.
3. Now add the dals in the mixer jar and powder them. Sieve the flour 2 times.
4. After 3 hours, drain the water completely. Now add it to the wet grinder. Grind it to a smooth paste.
5. Now transfer the ground rice batter to the wide vessel. Add the dal flour, unsalted butter, sesame seeds and required salt. Mix them gently and evenly. 
6. Grease the thenkuzal press with little oil. Use star shape plate for this thenkuzal.Take a handful of the prepared dough and make oblong shaped balls. Now keep the balls in the thenkuzal press and close it with the press lid. Squeeze the thenkuzal on a greased ladle. 
7. Heat the oil on low medium flame. When the oil is hot, add the thenkuzal one by one. After 3 minutes, gently flip them and fry till the shhh sound completely stops. Take the thenkuzal one by one with a murukku needle. Drain them and add it to the airtight container.


Magizhampoo Thenkuzhal/ Mullu Murukku with step by step photos


1. Take a broad vessel and add the idly rice. Wash the rice 3 times in water and add 8 cups of water. Soak the rice for 3 to 4 hours.


2. While the rice is soaking, let us prepare the dal flour. Heat a pan and dry roast the chana dal. Stir and roast the dal on low flame. When you notice some dals change its colour quickly transfer it to the plate. (Do not brown the dals fully). In the same pan, roast the moong dal. When you see light brown colour on few dals transfer it to the plate. Finally, add the urid dal. Roast it till light golden brown and transfer it to the plate. Allow them to cool completely. 


3. Now add the dals in the mixer jar and powder them. Sieve the powder and keep the dal ravas (kurunai) separately in a bowl. You can add this rava when grinding the rice. If you are preparing the flour in large quantity, you can grind the flour in the rice mill. 


4. After 3 hours, drain the water completely. Now add it to the wet grinder. Grind it to a smooth paste. With regular intervals, add water and scrape the rice from the sides of the drum. If you have the leftover dal ravas (kurunai) add it to this rice and grind it. Grinding process will take around 25 to 30 minutes. 


5. Now transfer the ground rice batter to the wide vessel. Add the dal flour, unsalted butter, sesame seeds and required salt. Mix them gently and evenly. 
(No need to add any water). Be careful while adding salt because if you add more salt it will reduce the crispness.


6. Grease the thenkuzal press with little oil. Use star shape plate for this thenkuzal. Take a handful of the prepared dough and make oblong shaped balls. Now keep the balls in the thenkuzal press and close it with the press lid. Squeeze the thenkuzal on a greased ladle. 


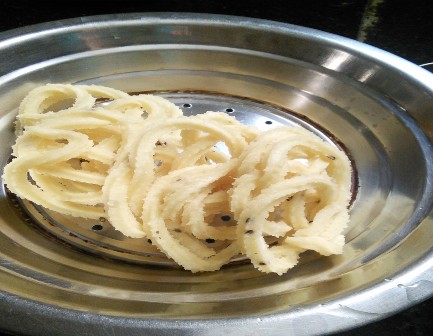
7. Heat the oil on low medium flame. When the oil is hot, add the thenkuzal one by one. (You can add 7 to 8 thenkuzhal for 1 batch). After 3 minutes, gently flip them and fry till the shhh sound completely stops. Take the thenkuzal one by one with a murukku needle. Drain them and add it to the container.


8. Repeat the process for the entire dough. Once it cooled down to room temperature keep the thenkuzhals in an airtight container.


Similar recipes


Comments

Popular posts from this blog

Quick Paneer Masala - 15 minute Paneer Gravy - Easy Paneer Masala

Quick Paneer Masala - this homemade restaurant style paneer masala is one of my most frequently made gravy recipes. It's perfect with chapathi, poori, nann and also for pulao varieties. Fresh tomatoes help to  make the best gravy, especially when you use red ripe tomatoes. What makes this quick paneer masala easy to make and why it calls for 15 minute gravy is because instead of pureeing the tomatoes, it's made with ground tomato paste. For paneer butter masala, we blanch the tomatoes and then made into puree. But I want to prepare a quick gravy with simple process. During the summer season, I like to prepare gravy and sambar with a shortcut.This quick paneer masala is one of the best 15 minute gravy recipes for beginners and also for busy mothers. I am actually really excited about this gravy because this paneer masala is made without any artificial colours, fresh cream. It has a delicious flavour with a smooth, creamy gravy.    Tips for the best Paneer masala Use fresh ...

Collection of Poriyal & Thoran - South Indian Vegetable Side Dishes for Lunch

Every day we prepare two varieties of vegetable side dishes for our lunch. Among those two varieties there must be a poriyal dish and the other one is kootu, aviyal or varuval. Varieties of poriyal  dishes are countless with our seasonal vegetables. As I said in my poriyal or thuvaram dishes, we add the ground coconut mixture prepared with coconut, small onions, garlic cloves and red chilly or green chilly. This unique coconut paste is often used in our poriyal or thuvaram dishes. Some prefer to add grated coconut or desiccated coconut powder for poriyal dishes. I actually don't like poriyal dishes made without any flavours. For me, poriyal must have a mix of flavours with perfect textures. We usually precook the vegetables in a vessel (except for keerai poriyal) and then we saute it with the tempering ingredients and finished with our coconut mixture. If you find it difficult to precook the vegetables, you can prepare as you like. But actually pre cooking the ...

Carrot Capsicum Stir Fry - Low Calorie Side Dish Recipes

Carrot Capsicum Stir Fry - another low calorie side dish for chapathi and rice. You can prepare this healthy side dish within 10 minutes. Last year during lockdown I prepared many sabji recipes for the Aval Vikatan magazine. This carrot capsicum stir fry is also one among those dishes and l often prepare this stir fry for our dinner. In addition to carrot and capsicum, you can also add boiled cauliflower, potato and broccoli. The crushed cumin pepper powder gives a nice flavour to this dish. There is no need for any other extra masala powders for this recipe. Made with a few simple ingredients and this will be your favourite 10 minute side dish. If you cook the capsicums correctly, it brings out their unique flavour and you can absolutely enjoy this dish as a salad. If you don't crush the cumin pepper you can also add chat masala powder.  Check out my other low calorie recipes here Low calorie Black Chana Masala Sprouts and Mushroom Dal Green Moong Dal Sabji Easy Dal Dal Fry  ...

Street Style Sundal Masala Recipe - Perfect Evening Snack - Vandikadai Sundal Masala

Cozy up with a warm and comforting bowl of street style sundal masala, perfect for the winter season. This flavorful evening snack is made with a combination of green and yellow peas, cooked in an aromatic gravy. To prepare this dish, soak the peas for 7-9 hours, then pressure cook until soft. The magic lies in the ground masala, featuring onions, tomatoes, ginger, garlic, coriander leaves, and mint leaves. Add a blend of chilly powder, kuzhambu chilly powder, and garam masala powder to elevate the flavor. Finish with a sprinkle of chat masala and a garnish of chopped onions, grated carrot, and coriander leaves. Now let's see the detailed recipe to prepare this mouthwatering Sundal Masala gravy.  Check out my other Evening Snacks Recipes Vazhaikkai (Plantain) Bajji  Cauliflower Fry    Nullikai urundai - Urid dal balls Kara Vadai -  Pattani Paruppu (Yellow Split Peas) Bonda Sabudana Vada -  Javarisi Vadai Ulundha Vada  Tapioca Bonda  Urad dal Bonda...

Tirunelveli Kootanchoru - Mixed vegetables rice with dals and spices

Kootanchoru is a popular lunch dish from Tirunelveli. This is our family favourite rice and it is rich in nutrients as it contains lots of vegetables and dals. We prepare this rice frequently for special events and family get togethers.  In most of Tirunelveli dishes we use small onions, garlic, coconut and generous amount of jeera. In this dish also we have used coconut small onion paste and good amount of fresh vegetables. We add commonly used vegetables such as raw banana, brinjals, drumsticks, carrots, beans and potatoes. I have learned this recipe from my grandma. She taught me with her some useful tips and techniques about how to cook, when to add the ingredients and how to choose the correct vegetables. My son named as Tirunelveli biriyani for this rice.  Now let's see how to prepare this kootanchoru with step by step photos.   Here is a short video for Tirunelveli Kootanchoru

Street Style Vegetable Fried Rice - Quick Recipe of Veg Fried Rice Street Food Style

Today we are going to see an interesting street style vegetable fried rice with simple cooking techniques. For the past twenty years, vegetable fried rice and pani puri have been a favourite food for many of us. Everywhere we can see, these two dishes are the stars of the street food. One day during our trip to Tirumala, I learnt this street style vegetable fried rice from a street food vendor. He prepared varieties of fried rice within a few minutes, very casually. As he was preparing, I saw exactly how it was done. There's something magical about eating hot fried rice on the streets.The sound of the street vendors tossing the tang tang with their wok is always enjoyable to me. How to make street style vegetable fried rice in your home kitchen  You can use basmati rice or long grain rice. Always prefer the open pot method to cook the rice for fried rice. The texture will be perfect with less stickiness. Brands such as Unity and India Gate are perfect for fried rice.  You can ...

Bottle Gourd Kootu - Easy and Healthy Bottle Gourd Kootu Recipe - Quick Pressure Cooker Method With Fresh Coconut Masala

If you're looking for a healthy and flavorful South Indian dish, this bottle gourd kootu recipe is a must-try! Made with tender bottle gourd (lauki), protein-rich dals, and a fresh coconut masala, this simple kootu is not just delicious but also packed with nutrition. It’s light enough to enjoy as a salad and hearty enough to serve as a side dish with rice or chapati. Known for its cooling properties, bottle gourd is one of the best vegetables for summer, helping with hydration and digestion. This easy pressure cooker kootu comes together in minutes and is perfect for anyone who loves traditional, healthy South Indian food. Whether you're craving a quick lunch, a vegan side, or a refreshing Indian salad recipe, this kootu is sure to become a favorite! Let’s see some important tips for making perfect kootu. If you want your kootu recipe to be simple yet super delicious, it's all about using the right techniques rather than following tough methods. First point: Always rinse t...

Tomato green chilly chutney - Tomato chutney with green chillies - Side dish for Idli, Dosa and Ven Pongal

In most of our houses we prepare either coconut chutney with red chillies or green chillies as an accompaniment for idlies and dosas. Sometimes these two chutneys are really boring on regular rotations. One day my Chithi(aunt) taught me this different tomato chutney with green chillies. Normally for tomato chutney we add dried red chillies or red chilly powder, but in this dish the tomatoes are cooked along with green chillies and then made into a paste. The paste is further sauted with onions and flavoured with little sambar powder. The combination of the green chillies and tomatoes pair each other perfectly and perfect side dish for idly, dosa, pongal and upma.    Checkout my other recipes with tomatoes.  Tomato Onion Thokku Tomato  Rasam Tomato Sabji Tomato Pasta Tomato Thokku Tomato Millet rice Tomato Jam  Spicy Tomato Rice  Tomato Dosa  Tomato Coconut Chutney   Tomato Kurma  Tomato Rice   Tomato chutney  ...

Rajma Sweet Corn Salad with Curd Dressing - Healthy Protein-Rich Salad

If you’re looking for a light, refreshing, and protein-rich salad, this Rajma Sweet Corn Salad is the perfect choice! Almost 19 years ago, when we were in California, I used to enjoy the Chipotle burrito rice bowl. It was a wholesome meal with black-eyed peas, long grain rice, sweet corn, sour cream, guacamole, and tossed capsicum onion slices(fajita). Among all the Italian, Mexican, and Chinese restaurants I tried in the US, that Chipotle burrito bowl has always been my all-time favorite. Recently, when I prepared this Rajma Sweet Corn Salad with curd dressing, the taste immediately reminded me of that burrito bowl I loved so much. The combination of rajma and sweet corn with the creamy curd dressing brought back those nostalgic flavors in a healthier, Indian-inspired way. Rajma (kidney beans) takes a little longer to cook than other legumes like chickpeas or peanuts, but the effort is worth it. With the sweetness of corn, the crunch of fresh veggies, and the tangy curd dressing, this...

Millet Veg Noodles - Vegetable Ragi Millet Noodles - Siruthaniyam Noodles

Vegetable ragi millet noodles recipe with step-by-step instructions. Recently I bought this ragi millet noodles from mothers millets brand in a supermarket. They have a wide range of millet noodles, red rice noodles and many more.  I haven't tried any millet noodles and this year is the international year of millets and I wanted to take this as a chance to cook and post different millet recipes to share with you all. I tried this ragi vegetable noodles with the colourful vegetables as we add it for our regular vegetable noodles. As it's my first time, I have added their tastemaker maker given in their pack. I haven't added any other sauces and masala powders. It came out really good and it can be prepared easily within 20 minutes.  Check out my other tiffin recipes here Idli Black urid dal Dosa Pearl Milet Dosa - Kambu Dosa Aapam - Aapam without yeast  Ragi flour Upma Arisi Upma Poori Bottlegourd Adai Pepper dosa - Milagu Adai Rava Upma Semiya Upma   Rava Dosa V...